Events: Difference between revisions
No edit summary |
|||
| (22 intermediate revisions by 2 users not shown) | |||
| Line 1: | Line 1: | ||
[{{fullurl:{{FULLPAGENAMEE}}|printable=yes}} Print] | [{{fullurl:{{FULLPAGENAMEE}}|action=pdfbook&format=single}} PDF] | |||
[[File:tabs_settings_events.png|right|400px]] | [[File:tabs_settings_events.png|right|400px]] | ||
The Events menu option lets you configure which events you will offer at your tournament, as well as a number of options specific to each event. While not required, it's usually recommended that you set up your [[Judge Groups]] before configuring your events. This will make it less likely you make a mistake or forget to assign an event to a judge group. | The Events menu option lets you configure which events you will offer at your tournament, as well as a number of options specific to each event. While not required, it's usually recommended that you set up your [[Judge Groups]] before configuring your events. This will make it less likely you make a mistake or forget to assign an event to a judge group. | ||
| Line 5: | Line 7: | ||
To add an event, click the "Add New Event" link in the sidebar: | To add an event, click the "Add New Event" link in the sidebar: | ||
[[File:setup_events_edit-addnew.png| | [[File:setup_events_edit-addnew.png|300px|center|border]] | ||
Fill out the same information shown on the "Main" tab below, and click "Save Event." Once you have created an event, you will see it listed on the right. | Fill out the same information shown on the "Main" tab below, and click "Save Event." Once you have created an event, you will see it listed on the right. | ||
[[File:setup_events_edit-events.png| | [[File:setup_events_edit-events.png|300px|center|border]] | ||
Clicking the name of an event in the sidebar will allow you to edit the settings for that event, and will show you a set of tabs for different settings: | Clicking the name of an event in the sidebar will allow you to edit the settings for that event, and will show you a set of tabs for different settings: | ||
[[File:setup_events_edit-tabs.png| | [[File:setup_events_edit-tabs.png|500px]] | ||
You will also have a link on the sidebar to go directly to the settings for the Judge Group affiliated with that event. | You will also have a link on the sidebar to go directly to the settings for the Judge Group affiliated with that event. | ||
| Line 20: | Line 22: | ||
The Main tab contains all the general settings for that event: | The Main tab contains all the general settings for that event: | ||
[[File:setup_events_edit-main.png| | [[File:setup_events_edit-main.png|600px|center|border]] | ||
'''Full Name''' - The full name of your event. If setting up multiple divisions of the same event, should include something like "Open" or "Novice in the name as well. | '''Full Name''' - The full name of your event. If setting up multiple divisions of the same event, should include something like "Open" or "Novice in the name as well. | ||
| Line 31: | Line 33: | ||
'''Maximum competitors per entry''' - The maximum number is almost always 1 (for IE's and LD), or 2 (for team debate events). If you have a debate event that allows 3 or 4 person teams (for example novice policy in some states), you would use a higher number. Note that this is NOT a per-school cap on the number of entries you can have in an event, it is only the limit on the number of people in a single entry. | '''Maximum competitors per entry''' - The maximum number is almost always 1 (for IE's and LD), or 2 (for team debate events). If you have a debate event that allows 3 or 4 person teams (for example novice policy in some states), you would use a higher number. Note that this is NOT a per-school cap on the number of entries you can have in an event, it is only the limit on the number of people in a single entry. | ||
'''Clone settings of''' - If you choose another event and click "Save Event," it will overwrite your current Event settings with the settings from the other event. This is useful when creating a large number of similar events, for example Open and Novice divisions for each of a number of IE's. | |||
'''Judge Group''' - Which judge group the event should pull judges from. If you use similar names for your event and judge group, you may find this set to the correct value automatically. If you created your events before creating a judge pool, make sure to return to this screen and set a judge group once you have configured them. | '''Judge Group''' - Which judge group the event should pull judges from. If you use similar names for your event and judge group, you may find this set to the correct value automatically. If you created your events before creating a judge pool, make sure to return to this screen and set a judge group once you have configured them. | ||
'''Designate entries''' - Controls how entries will appear in registration lists and on schematics and ballots. You have a large number of choices to use various combinations of numeric codes, first/last names, initials, or school codes or names. Note that changing this setting does not affect entries which have already been created/entered. So you if you change this half-way through your registration window, you may need to go to Entries - | '''Designate entries''' - Controls how entries will appear in registration lists and on schematics and ballots. You have a large number of choices to use various combinations of numeric codes, first/last names, initials, or school codes or names. Note that changing this setting does not affect entries which have already been created/entered. So you if you change this half-way through your registration window, you may need to go to '''Entries - Data''' and "recode" your entries to get a consistent scheme. For more information, see the section on [[Managing Entries]]. | ||
'''Start entry codes with''' - Numeric value to start the entry codes with for the event, so that for example all LD entries start with 200, Oratory starts with 300, etc. You can also assign these values en masse for all events. See the section below on [[#Speaker Codes]]. | '''Start entry codes with''' - Numeric value to start the entry codes with for the event, so that for example all LD entries start with 200, Oratory starts with 300, etc. You can also assign these values en masse for all events. See the section below on [[Events#Speaker Codes|Speaker Codes]]. | ||
'''Event Type''' - Set the type of event, for example Speech, Congress, Policy, LD, PF | '''Event Type''' - Set the type of event, for example Speech, Congress, Policy, LD, or PF. You should only use the generic "Debate" type for other more exotic forms of debate. This will help Tabroom format certain things correctly or provide reasonable defaults geared toward the event in question. | ||
'''Event Level''' - Choose between Open/Varsity, JV, Novice, etc. This will affect how certain result sets are computed, for example if you wanted to get a list of the best Novice participants across all events. | '''Event Level''' - Choose between Open/Varsity, JV, Novice, etc. This will affect how certain result sets are computed, for example if you wanted to get a list of the best Novice participants across all events. | ||
''' | '''NSDA Points''' - If an NSDA member school has entered your tournament, you'll see an additional option for each event that lets you choose which NSDA event type students should receive NSDA honor points for. Make sure to select this for each event to enable NSDA points from your tournament to be "autoposted." | ||
[[File:setup_events_edit-nsda.png|600px|center|border]] | |||
== Registration == | |||
The Registration tab is where you configure event-specific registration options: | |||
[[File:setup_events_register.png|600px|center|border]] | |||
'''Event-Specific Entry Registration Deadline''' - Use this if you need to set a registration deadline for an event which is earlier than the general tournament registration deadline. This can be useful for example when you have few events that use MPJ, and you want to close registration earlier to leave time for prefs to be completed. | |||
'''Start Speaker Codes With''' - The number to start with when creating entry codes for the event. You can also configure all events' codes at once with the [[Events#Speaker Codes|Speaker Codes]] link | |||
'''Total Field Cap''' - Sets a hard limit on the number of total entries in the event. | |||
'''Per-School Cap''' - Sets a limit on the number of entries any one school can have in the event. | |||
'''Waitlist entries over caps''' - Will add any entries a school tries to enter beyond a cap (either general or per-school) to the waitlist. For more information on managing the waitlist, see the section on [[Managing Entries]]. | |||
'''Waitlist all entries''' - Use this option if you want all entries to be added to the waitlist, which will allow you to manually clear entries into the tournament. | |||
'''Required number of qualifiers/bids''' - If your tournament has an explicit bid qualification process, you can include the number required here. | |||
'''Allow entry of quals above minimum''' - This allows schools to enter teams if they're qualfied (i.e. have more than the required number of bids), over the minimum. | |||
'''Allow at-large (non-qualified entries)''' - This lets school's enter teams even if they're not qualified (i.e. they lack the required number of bids). Usually used in conjunction with the waitlist settings to clear "at-large" teams into the tournament at your discretion. | |||
'''No judge obligations''' - Overrides over judging settings and doesn't require any obligated judging for entries in the event. | |||
'''Judges can strike self from event''' - This allows judges to self-select that they don't want to judge an event. For example, can be useful to allow inexperienced judges to choose not to judge a "Championship" division. | |||
'''Publish web field report''' - Controls whether your public tournament info includes a "field report" with stats about the entries. | |||
'''Include Waitlist on field report''' - If selected, the field report above will include the teams on the waitlist. | |||
'''Hide entry codes at registration''' - This will prevent showing registering schools the entry codes for each of their entries, to maintain a little extra anonymity. | |||
'''Ask for piece titles''' - Will prompt registrants to provide a title for their piece/performance. Only used for events with piece titles, like Interp events or Oratory. | |||
'''Allow double entry within event''' - Allows a single entry to compete twice in the same event. For example, could be used to allow an entry to perform two different Dramatic Interp pieces in the same event, or if you only had one Interp event, to perform one Dramatic and one Humorous piece. | |||
'''Supplemental Event''' - Marks the event as a "supplemental" event, usually considered one that doesn't count towards sweepstakes, or that students can participate in if they are not participating in the elimination rounds of their main event. | |||
'''No Judge Prefs''' - This disables any form of MPJ for the event. | |||
== Online Event Settings == | |||
At Settings > Event > select event > Online tab, you can configure settings for holding your events virtually. | |||
[[File:setup_events_online_settings.png|600px|center|border]] | |||
'''Online Event''' - Toggle this button if this event is being held virtually. This button must be toggled on to see additional online tournament options. | |||
'''Show room URLs on public schematic''' - Use this feature to make the links to virtual competition rooms visible on the schematics that are publicly accessible. This option will not work for NSDA Campus rooms that are not built to be visible to anyone except participants in those rounds. | |||
'''Asynchronous links to online videos''' - Use this feature to ask coaches to submit a link to each entry's recorded performance during the registration process. Coaches can only submit one performance link per entry. | |||
'''Synchronous via pre-created room URLs''' - Use this feature to if your tournament is using virtual rooms through an external video conferencing platform like Google Hangouts or Zoom. Enabling this option allows you to put a link to each room in your Sites & Rooms settings. Round participants will be able to access that link directly from their ballot. If you want those links to be publicly accessible, click the "Show room URLs on public schematic" option as well. | |||
'''NSDA Campus''' - Select this option to indicate that you will purchase NSDA Campus rooms to hold this event. NSDA Campus rooms are for live competition. More info about NSDA Campus can be found [https://www.speechanddebate.org/nsda-campus/ here]. | |||
'''Event Campus Room Limit''' - You only need to put a number here if this event is using NSDA Campus rooms. If it is, enter the number of rooms you would like to allocate to this event here. | |||
'''Live-streamable elims & finals''' - This setting only applies if you are using NSDA Campus for this event. On the NSDA's private server, live streaming is not automatically available with a Youtube key. This setting sends final & elimination rounds to a public Jitsi server, which permits easier YouTube streaming, but also is potentially less secure. Do not change this setting in the middle of an ongoing elim/final round; all your rooms will suddenly be sent to a new place. | |||
'''Event Campus Room Limit''' - This option will only appear if you are using NSDA Campus. You only need to put a number here if this event is using NSDA Campus rooms. If it is, enter the number of rooms you would like to allocate to this event here. | |||
'''Identify Users in Online Rooms''' - This option will only appear if you are using NSDA Campus. Toggling the "Prepend Role (Judge/Entry/Tab)" button will automatically name round participants with their role when they enter a competition room. The Entry Display and Judge Display options also allow you to choose how entries' and judges' names appear in the competition room. If you turn on the Prepend Role option and have Entry Display set to Entry Code, that means a debater will enter the room as "Entry Ankeny LB". | |||
'''Online Support Options''' - This option will only appear if you are using NSDA Campus. This allows you to dedicate a support email and instructions per event. These instructions will appear in the online competition rooms for this event. Participants in this event can directly email the email you enter about any tournament problems through their competition room. | |||
== Pairing/Tabulation == | |||
The Pairing and Tabulation tabs are where you set up ballots for the event, certain rules for how judges are placed, and configure some result options. | |||
Note that some of these options can be changed while the tournament is underway. For example, you could check the "Judges may judge their own school" box before the final prelim if it became impossible to pair a small division in the last round. | |||
=== Pairing/Sectioning === | |||
The Pairing/Sectioning options differ depending on your selected event type. For IE events, it will let you configure whether "Sections" of an event (e.g. a room of an IE event) are labeled with numbers or letters, and choose whether the ballot contains a description of the event rules: | |||
[[File:setup_events_tabbing-pairing.png|400px|center|border]] | |||
For Debate events, there are more extensive options: | |||
[[File:setup_events_tabbing-pairing-debate.png|300px|right|border]] | |||
'''Round Robin format''' - will enable configuring of pods (if desired) and pairing the event as a round robin. | |||
'''Flip for side in all rounds (PF)''' - Mostly useful for Public Forum, will cause each round to be listed as flip for sides, with no constraints imposed by the pairing. | |||
'''Assigned sides (no flips) in elims''' - This setting makes it so that your schematics are not labeled "Flip for sides". Note that this will NOT randomly assign sides in elims. Instead, this setting should be enabled if you are conducting a flip manually in the room or if you plan to manually assign sides. | |||
'''Give combined points, not per speaker''' - Some debate events give a single point value to an entire team, rather than points for each individual speaker. | |||
'''Allow teams to debate own school''' - Useful primarily at very small tournaments with one or a few "large" schools with the majority of the entries, such that pairing rounds would be impossible without allowing schools to debate themselves. | |||
'''Avoid in-region matchups in presets''' - If you have enabled "Use Regions" in the main tournament settings, and assigned schools to regions in '''Entries - Data,''' this option will try to avoid scheduling entries from the same region against each other in preset rounds. | |||
'''Preset Seeding''' - Choose a method for pairing preset rounds. If you choose an option other than "Randomly," you will need to assign preset seeds to each entry. The options for pairing are described in the menu - the most common non-random method is "Hit All Seed Categories," followed by "Balance seeds of presets to same total." For more information see the section on [[Managing Entries#Preset_Seeds|Preset Seeds]]. | |||
'''Powermatch by''' - All powermatching is done based on the Tiebreak rules you set in '''Settings - Rules & Results,''' but this option lets you choose whether powermatching should use the "SOP" method, or only the entry's seed. SOP uses a combination of the entry's seed and their prior opponent's current seed, which helps to create a more "balanced" draw for each team. SOP has emerged as the standard for powermatching - unless you're sure what you're doing, it's recommended you leave the default. | |||
'''Pullup method''' - Choose a method for determining which entry gets pulled up to a higher win bracket. It's recommended that you stick with the default, which is "Worst average opponent seed," unless you know exactly what you're doing. | |||
'''Allow repeat pullups by same team (recommended for SOP method)''' - This option is recommended if you're using the default SOP powermatching method above, since it can help even out the difficulty of a team's draw. | |||
'''Minimize pullups (breaks side locks)''' - This option will try as hard as possible to avoid pulling a team up to a higher win bracket, even if it means breaking side locks and having them debate on the same side more than half the time. Most tournaments shouldn't use this. | |||
'''Assign rooms by brackets''' - This will make the auto-assign room functions work by brackets, which can help keep teams of similar records in the same set of rooms, minimizing the distance people have to move. If you use this option in concert with assigning room "quality" ratings, it can help put the higher win brackets in better rooms, while relegating the lowest-win brackets to your worst rooms. | |||
=== Judging === | |||
The Judging section contains options for how judges from the event's judge group are placed into the event: | |||
[[File:setup_events_tabbing-judging.png|400px|center|border]] | |||
'''Judges may judge their own school''' - Generally not recommended, but can be useful in very tight judging situations or when one school is much larger than all the other schools in the field. | |||
'''Block first year out judges''' - This will prevent first year judges from judging this event. Note that this requires you to configure the associated Judge Group to allow marking which judges are first year's, otherwise this setting will have no effect. | |||
'''Minimum section size''' - For Individual Events with multiple competitors in the same round. This sets the smallest number of competitors that should be in each section of the event. | |||
'''Maximum section size''' - Sets how large a section the event will allow before creating a new section. | |||
'''Default section size''' - The size of a section the pairing algorithm will aim for if possible. Usually it's best to put this value in between the minimum and maximum section sizes. For example, set a minimum of 5, a default of 6, and a maximum size of 7. | |||
'''Limit a school to this % of section''' - If set, will prevent a single school from having more than a certain percentage of the competitors in any given section. Useful to try and ensure an even distribution of students between sections, especially when one school has many more entries than the average school in the field. | |||
'''Elim snake adjustment''' - Choose the method for how to distribute competitors from the same school across sections in the elimination rounds of a speech event. There are several different options for how to determine where entries should be placed. | |||
'''Auto-fill blanks as truncate rank''' - When selected, this will give any entry that was given a blank in a round (i.e. no score) the value of your "Truncate Rank" set in your tiebreak set. For example, if you have your tiebreakers set to truncate ranks to 5 (so all ranks of 6 or more are changed to a 5), then if a student wasn't ranked, they would receive a 5. | |||
=== Results === | |||
The Results section lets you configure options for the event's ballot and results computations: | |||
[[File:setup_events_tabbing-results.png|400px|center|border]] | |||
'''Use live updates (Text/Emails)''' - Choose whether to use the Live Updates feature for this event, which will email/text entries and judges with schematics and results if they have linked their tabroom account to the relevant entry. | |||
'''Online Ballot Entry''' - Currently, only supported for Debate events, though Speech events should work soon. When enabled, this will allow judges to link their tabroom account to their judge entry at the tournament and complete their ballots online, rather than needing the tabroom to distribute, collect, and enter ballots. | |||
'''Minimum speaker points''' - The lowest number of speaker points a judge can assign. Note that this value MUST be set before Online Ballots will work, or before printed ballots will include a space for speaker points. If your online ballots are showing as "blank" to judges, this is why. | |||
'''Maximum speaker points''' - The maximum number of speaker points a judge can assign. Along with the minimum points, this value must also be set before ballots (online or printed) will function correctly. | |||
'''Point increments''' - Choose whether to use Whole, Half, Quarter, or Tenth points. | |||
'''Forbid low-point wins''' - When selected, will not allow a judge to assign a win to the team receiving lower points. | |||
'''Allowed tied points''' - By default, judges must give a different number of speaker points to each competitor in the round. Checking this box will allow them to give the same points to more than one person. | |||
'''Recognize top novices''' - Enable a report in the results which will show the "Top Novices" - you can choose whether to recognize the top novices in the overall event, or only those that didn't advance to elimination rounds. | |||
'''Recognize honorable mentions''' - Enables a report in the results to recognize competitors who did not advance to elimination rounds but were tied on ranks. | |||
=== Online Coin flips === | |||
Enabling this feature will conduct the coin flip through Tabroom.com so that students and judges do not need to perform one manually. | |||
[[File:Coin_flip.png|400px|center|border]] | |||
'''Online settings''' - First, make sure that your event is marked as an online event by going Settings > Events > select event > Online tab and toggle the "Online Event" button. Then, on the Tabulation tab, toggle the "Use Online Coinflips" button. | |||
'''Auto-flip (minutes post publication)''' - This feature allows Tabroom.com to text/email blast teams about who won the coin flip, giving you full control over how long it takes for a coin flip to occur and the round to start. The number you put here determines the delay time between the publishing of the round and the time that debaters begin the coin flip process. For example, if you set it for “5,” debaters will be notified five minutes after the round has been published whether they won or lost the flip. | |||
'''Flip deadline (minutes post flip publication)''' - This is the amount of time each entry has to make their selection after being notified it's their turn to choose a flip side. For example, if you set it to “10,” the winner of the coin flip will have 10 minutes to make a selection after they receive notification that they won or lost the flip. If it's a Public Forum event then, the loser of the coin flip will then have 10 minutes to make the other selection after the winner has registered their side or speaker position preference. If neither team makes the selection, sides/order will be randomly determined and locked after the deadline has passed. | |||
'''Winner chooses side or order (PF)''' - If you do not select this setting, the winner will only get to choose the side. The losing team will not make a selection unless the winning team fails to meet their deadline for selection. Toggle this setting if you would like the winning side to choose either side or order and the losing side to pick the opposite selection. | |||
'''Anyone chooses after deadline''' - If this setting is toggled, the winner of the coin flip will get their set amount of time to make a decision about which side they choose. If the winner does not make a selection within that time limit, then either team may choose their side. NOT toggling this button would mean that the losing team gets dedicated time to make a choice, and if they do not make their choice within the time limit, then Tabroom.com will choose for them. Toggling this button makes it so that if the coin flip winner does not make a choice, the first team to choose their side wins. | |||
'''Flip separately for 2nd flights''' - This setting applies to flighted events. If you want your flight A and B coin flip to occur at the same time X minutes after you publish the round, do NOT toggle this setting. If you would like the flight A coin flip to happen X minutes after you publish the round and the flight B coin flip to happen Y minutes after the flight A coin flip, toggle this button. You can determine how much time you would like between the flight A coin flip and the flight B coin flip by entering a number in the “Flight length in minutes” section at Settings > Events > select event > Tabulation. If you enter that you want the auto-flip (minutes post publication) to be 5 and the Flight length in minutes to be 60, then your flight A flip will happen 5 minutes after you publish the round, and the flight B flip will happen 60 minutes after your flight A flip (or 65 minutes after you publish the round). | |||
'''How to monitor the coin flip''' - From the Schematics screen, you will see a button at the top labeled “Actions”. Here, you can see the time the flips were performed and when they were blasted. If something happened and flips were not performed or blasted upon publishing, you can manually push through the flip and blast on this page. You can also manually flip the flights separately from this page or change the deadline across the board for the flip selections. Additionally, clicking on the room number of a particular section and scrolling to the bottom, you will see “Flip Status” that lists whether the flip was performed for those students, who made which selection, and if a selection was not made, which team missed their deadline. You can also manually redo flips for individual sections from this page. | |||
== Ballot & Rules == | |||
While some ballot settings are set on the previous Tabulation tab, the Ballot & Rules tab will let you set a message or explanation of rules that will appear on ballots for the event, as well as include a description of the event that will be visible on your tournaments public website: | |||
[[File:setup_events_messages.png|400px|center|border]] | |||
== Updates == | |||
The Updates tab lets you set one or more "followers" for the event by adding their Tabroom account username/email. Followers will receive a text and email when the first and last ballot is confirmed for each round of the event. This can be useful when you have tournament staff who are delegated to help track down ballots, or when you have a dedicated tab person who runs a single event and would like to be notified when it's time to start tabbing or pairing the next debate. | |||
[[File:setup_events_follow.png|500px|center|border]] | |||
== Deleting/Merging Events == | == Deleting/Merging Events == | ||
If you need to delete an event, first select it from the list on the sidebar, and then use the "Delete" box: | If you need to delete an event, first select it from the list on the sidebar, and then use the "Delete" box: | ||
[[File:setup_events_edit-delete.png| | [[File:setup_events_edit-delete.png|250px|center|border]] | ||
If you want to merge or "collapse" the event into another, for example if the Novice division was too small and had to be merged with the Open division, select the event in the "Merge with" box and click Go. | If you want to merge or "collapse" the event into another, for example if the Novice division was too small and had to be merged with the Open division, select the event in the "Merge with" box and click Go. | ||
| Line 57: | Line 239: | ||
If you need to manually change the starting code number for multiple events, it's usually faster to do this all at once than edit each individual event's settings. Click the "Speaker Codes" link under Batch Changes in the sidebar, and you will be given a list of all events and their starting codes. Just edit the codes in one place, and then click "Save Changes:" | If you need to manually change the starting code number for multiple events, it's usually faster to do this all at once than edit each individual event's settings. Click the "Speaker Codes" link under Batch Changes in the sidebar, and you will be given a list of all events and their starting codes. Just edit the codes in one place, and then click "Save Changes:" | ||
[[File:setup_events_mass-recode.png|400px]] | [[File:setup_events_mass-recode.png|400px|center|border]] | ||
== Double Entry Limits == | == Double Entry Limits == | ||
| Line 66: | Line 248: | ||
First, you'll need to enable double entries by changing the Tournament-wide setting. | First, you'll need to enable double entries by changing the Tournament-wide setting. | ||
[[File:setup_events_double-entry-main.png| | [[File:setup_events_double-entry-main.png|500px|center|border]] | ||
You can choose to "Allow up to maximum" to choose the maximum number of competitors that will be allowed to double enter at the tournament, or choose "Unlimited double entry" to set no limit. | You can choose to "Allow up to maximum" to choose the maximum number of competitors that will be allowed to double enter at the tournament, or choose "Unlimited double entry" to set no limit. | ||
| Line 72: | Line 254: | ||
If desired, you can then configure "groups" of events which are mutually exclusive with other groups, for example if you can enter only one of LD or Policy: | If desired, you can then configure "groups" of events which are mutually exclusive with other groups, for example if you can enter only one of LD or Policy: | ||
[[File:setup_events_double-entry-groups.png| | [[File:setup_events_double-entry-groups.png|500px|center|border]] | ||
To create a group, click "Add New" and then give the group a name and choose what kinds of double entries (if any) are allowed: | To create a group, click "Add New" and then give the group a name and choose what kinds of double entries (if any) are allowed: | ||
[[File:setup_events_event-double-add.png| | [[File:setup_events_event-double-add.png|500px|center|border]] | ||
If you choose "None" then entries within that group will not be allowed to enter any other events. If you choose "Unlimited" then they will be able to enter any other events. If you choose "None within group" then they will only be able to enter one event within that group (e.g. only one of Policy or LD). Or, you can set a maximum number of events that can be entered in the group. | If you choose "None" then entries within that group will not be allowed to enter any other events. If you choose "Unlimited" then they will be able to enter any other events. If you choose "None within group" then they will only be able to enter one event within that group (e.g. only one of Policy or LD). Or, you can set a maximum number of events that can be entered in the group. | ||
Once you have set up the group, you can add events to it by choosing the group for each event, and clicking "Save Event Groupings." If you have multiple groups, you can also choose a value for any mutually exclusive "Cross Entry Group." | Once you have set up the group, you can add events to it by choosing the group for each event, and clicking "Save Event Groupings." If you have multiple groups, you can also choose a value for any mutually exclusive "Cross Entry Group." | ||
[[Category:Tabroom Manual|4e]] | |||
Latest revision as of 17:15, 6 November 2020
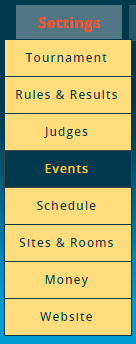
The Events menu option lets you configure which events you will offer at your tournament, as well as a number of options specific to each event. While not required, it's usually recommended that you set up your Judge Groups before configuring your events. This will make it less likely you make a mistake or forget to assign an event to a judge group.
Adding Events
To add an event, click the "Add New Event" link in the sidebar:
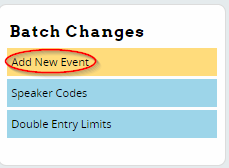
Fill out the same information shown on the "Main" tab below, and click "Save Event." Once you have created an event, you will see it listed on the right.
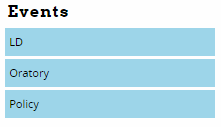
Clicking the name of an event in the sidebar will allow you to edit the settings for that event, and will show you a set of tabs for different settings:
You will also have a link on the sidebar to go directly to the settings for the Judge Group affiliated with that event.
Main Event Settings
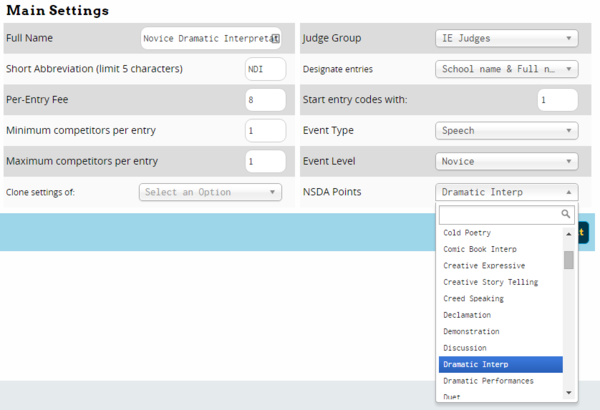
The Main tab contains all the general settings for that event:
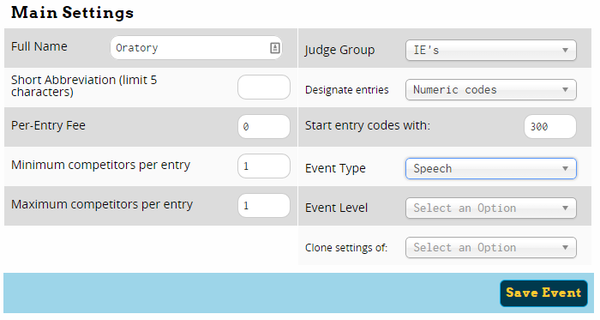
Full Name - The full name of your event. If setting up multiple divisions of the same event, should include something like "Open" or "Novice in the name as well.
Short abbreviation (limit 5 characters) - Tabroom will use this short abbreviation in many spots in the interface and printed materials. For example, you could use OLD for Open LD and NLD for Novice LD.
Per-Entry Fee - How much a school will be charged for each entry in this event. Note that an "entry" includes however many competitors you set for the event (e.g. 1 for LD, or 2 for CX).
Minimum competitors per entry - The minimum number should almost always be 1 (for IE's and LD), or 2 (for team debate events). You could set it to 1 for a team event if you wanted to allow maverick entries.
Maximum competitors per entry - The maximum number is almost always 1 (for IE's and LD), or 2 (for team debate events). If you have a debate event that allows 3 or 4 person teams (for example novice policy in some states), you would use a higher number. Note that this is NOT a per-school cap on the number of entries you can have in an event, it is only the limit on the number of people in a single entry.
Clone settings of - If you choose another event and click "Save Event," it will overwrite your current Event settings with the settings from the other event. This is useful when creating a large number of similar events, for example Open and Novice divisions for each of a number of IE's.
Judge Group - Which judge group the event should pull judges from. If you use similar names for your event and judge group, you may find this set to the correct value automatically. If you created your events before creating a judge pool, make sure to return to this screen and set a judge group once you have configured them.
Designate entries - Controls how entries will appear in registration lists and on schematics and ballots. You have a large number of choices to use various combinations of numeric codes, first/last names, initials, or school codes or names. Note that changing this setting does not affect entries which have already been created/entered. So you if you change this half-way through your registration window, you may need to go to Entries - Data and "recode" your entries to get a consistent scheme. For more information, see the section on Managing Entries.
Start entry codes with - Numeric value to start the entry codes with for the event, so that for example all LD entries start with 200, Oratory starts with 300, etc. You can also assign these values en masse for all events. See the section below on Speaker Codes.
Event Type - Set the type of event, for example Speech, Congress, Policy, LD, or PF. You should only use the generic "Debate" type for other more exotic forms of debate. This will help Tabroom format certain things correctly or provide reasonable defaults geared toward the event in question.
Event Level - Choose between Open/Varsity, JV, Novice, etc. This will affect how certain result sets are computed, for example if you wanted to get a list of the best Novice participants across all events.
NSDA Points - If an NSDA member school has entered your tournament, you'll see an additional option for each event that lets you choose which NSDA event type students should receive NSDA honor points for. Make sure to select this for each event to enable NSDA points from your tournament to be "autoposted."
Registration
The Registration tab is where you configure event-specific registration options:
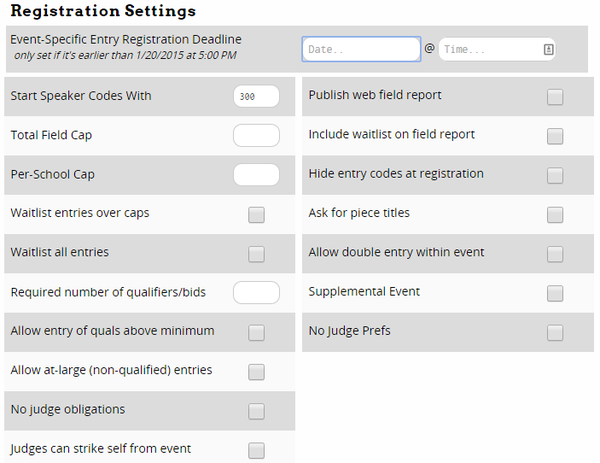
Event-Specific Entry Registration Deadline - Use this if you need to set a registration deadline for an event which is earlier than the general tournament registration deadline. This can be useful for example when you have few events that use MPJ, and you want to close registration earlier to leave time for prefs to be completed.
Start Speaker Codes With - The number to start with when creating entry codes for the event. You can also configure all events' codes at once with the Speaker Codes link
Total Field Cap - Sets a hard limit on the number of total entries in the event.
Per-School Cap - Sets a limit on the number of entries any one school can have in the event.
Waitlist entries over caps - Will add any entries a school tries to enter beyond a cap (either general or per-school) to the waitlist. For more information on managing the waitlist, see the section on Managing Entries.
Waitlist all entries - Use this option if you want all entries to be added to the waitlist, which will allow you to manually clear entries into the tournament.
Required number of qualifiers/bids - If your tournament has an explicit bid qualification process, you can include the number required here.
Allow entry of quals above minimum - This allows schools to enter teams if they're qualfied (i.e. have more than the required number of bids), over the minimum.
Allow at-large (non-qualified entries) - This lets school's enter teams even if they're not qualified (i.e. they lack the required number of bids). Usually used in conjunction with the waitlist settings to clear "at-large" teams into the tournament at your discretion.
No judge obligations - Overrides over judging settings and doesn't require any obligated judging for entries in the event.
Judges can strike self from event - This allows judges to self-select that they don't want to judge an event. For example, can be useful to allow inexperienced judges to choose not to judge a "Championship" division.
Publish web field report - Controls whether your public tournament info includes a "field report" with stats about the entries.
Include Waitlist on field report - If selected, the field report above will include the teams on the waitlist.
Hide entry codes at registration - This will prevent showing registering schools the entry codes for each of their entries, to maintain a little extra anonymity.
Ask for piece titles - Will prompt registrants to provide a title for their piece/performance. Only used for events with piece titles, like Interp events or Oratory.
Allow double entry within event - Allows a single entry to compete twice in the same event. For example, could be used to allow an entry to perform two different Dramatic Interp pieces in the same event, or if you only had one Interp event, to perform one Dramatic and one Humorous piece.
Supplemental Event - Marks the event as a "supplemental" event, usually considered one that doesn't count towards sweepstakes, or that students can participate in if they are not participating in the elimination rounds of their main event.
No Judge Prefs - This disables any form of MPJ for the event.
Online Event Settings
At Settings > Event > select event > Online tab, you can configure settings for holding your events virtually.
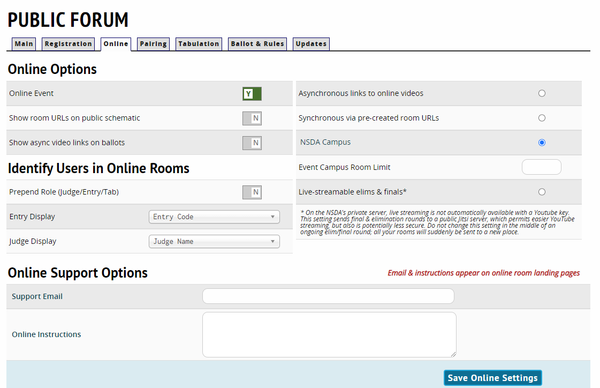
Online Event - Toggle this button if this event is being held virtually. This button must be toggled on to see additional online tournament options.
Show room URLs on public schematic - Use this feature to make the links to virtual competition rooms visible on the schematics that are publicly accessible. This option will not work for NSDA Campus rooms that are not built to be visible to anyone except participants in those rounds.
Asynchronous links to online videos - Use this feature to ask coaches to submit a link to each entry's recorded performance during the registration process. Coaches can only submit one performance link per entry.
Synchronous via pre-created room URLs - Use this feature to if your tournament is using virtual rooms through an external video conferencing platform like Google Hangouts or Zoom. Enabling this option allows you to put a link to each room in your Sites & Rooms settings. Round participants will be able to access that link directly from their ballot. If you want those links to be publicly accessible, click the "Show room URLs on public schematic" option as well.
NSDA Campus - Select this option to indicate that you will purchase NSDA Campus rooms to hold this event. NSDA Campus rooms are for live competition. More info about NSDA Campus can be found here.
Event Campus Room Limit - You only need to put a number here if this event is using NSDA Campus rooms. If it is, enter the number of rooms you would like to allocate to this event here.
Live-streamable elims & finals - This setting only applies if you are using NSDA Campus for this event. On the NSDA's private server, live streaming is not automatically available with a Youtube key. This setting sends final & elimination rounds to a public Jitsi server, which permits easier YouTube streaming, but also is potentially less secure. Do not change this setting in the middle of an ongoing elim/final round; all your rooms will suddenly be sent to a new place.
Event Campus Room Limit - This option will only appear if you are using NSDA Campus. You only need to put a number here if this event is using NSDA Campus rooms. If it is, enter the number of rooms you would like to allocate to this event here.
Identify Users in Online Rooms - This option will only appear if you are using NSDA Campus. Toggling the "Prepend Role (Judge/Entry/Tab)" button will automatically name round participants with their role when they enter a competition room. The Entry Display and Judge Display options also allow you to choose how entries' and judges' names appear in the competition room. If you turn on the Prepend Role option and have Entry Display set to Entry Code, that means a debater will enter the room as "Entry Ankeny LB".
Online Support Options - This option will only appear if you are using NSDA Campus. This allows you to dedicate a support email and instructions per event. These instructions will appear in the online competition rooms for this event. Participants in this event can directly email the email you enter about any tournament problems through their competition room.
Pairing/Tabulation
The Pairing and Tabulation tabs are where you set up ballots for the event, certain rules for how judges are placed, and configure some result options.
Note that some of these options can be changed while the tournament is underway. For example, you could check the "Judges may judge their own school" box before the final prelim if it became impossible to pair a small division in the last round.
Pairing/Sectioning
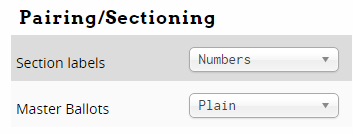
The Pairing/Sectioning options differ depending on your selected event type. For IE events, it will let you configure whether "Sections" of an event (e.g. a room of an IE event) are labeled with numbers or letters, and choose whether the ballot contains a description of the event rules:
For Debate events, there are more extensive options:
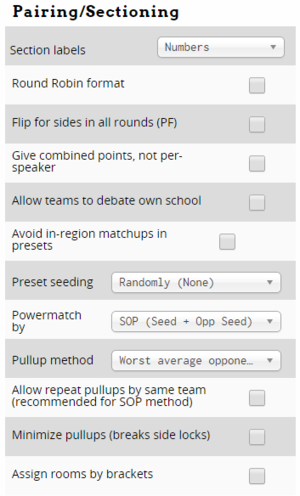
Round Robin format - will enable configuring of pods (if desired) and pairing the event as a round robin.
Flip for side in all rounds (PF) - Mostly useful for Public Forum, will cause each round to be listed as flip for sides, with no constraints imposed by the pairing.
Assigned sides (no flips) in elims - This setting makes it so that your schematics are not labeled "Flip for sides". Note that this will NOT randomly assign sides in elims. Instead, this setting should be enabled if you are conducting a flip manually in the room or if you plan to manually assign sides.
Give combined points, not per speaker - Some debate events give a single point value to an entire team, rather than points for each individual speaker.
Allow teams to debate own school - Useful primarily at very small tournaments with one or a few "large" schools with the majority of the entries, such that pairing rounds would be impossible without allowing schools to debate themselves.
Avoid in-region matchups in presets - If you have enabled "Use Regions" in the main tournament settings, and assigned schools to regions in Entries - Data, this option will try to avoid scheduling entries from the same region against each other in preset rounds.
Preset Seeding - Choose a method for pairing preset rounds. If you choose an option other than "Randomly," you will need to assign preset seeds to each entry. The options for pairing are described in the menu - the most common non-random method is "Hit All Seed Categories," followed by "Balance seeds of presets to same total." For more information see the section on Preset Seeds.
Powermatch by - All powermatching is done based on the Tiebreak rules you set in Settings - Rules & Results, but this option lets you choose whether powermatching should use the "SOP" method, or only the entry's seed. SOP uses a combination of the entry's seed and their prior opponent's current seed, which helps to create a more "balanced" draw for each team. SOP has emerged as the standard for powermatching - unless you're sure what you're doing, it's recommended you leave the default.
Pullup method - Choose a method for determining which entry gets pulled up to a higher win bracket. It's recommended that you stick with the default, which is "Worst average opponent seed," unless you know exactly what you're doing.
Allow repeat pullups by same team (recommended for SOP method) - This option is recommended if you're using the default SOP powermatching method above, since it can help even out the difficulty of a team's draw.
Minimize pullups (breaks side locks) - This option will try as hard as possible to avoid pulling a team up to a higher win bracket, even if it means breaking side locks and having them debate on the same side more than half the time. Most tournaments shouldn't use this.
Assign rooms by brackets - This will make the auto-assign room functions work by brackets, which can help keep teams of similar records in the same set of rooms, minimizing the distance people have to move. If you use this option in concert with assigning room "quality" ratings, it can help put the higher win brackets in better rooms, while relegating the lowest-win brackets to your worst rooms.
Judging
The Judging section contains options for how judges from the event's judge group are placed into the event:
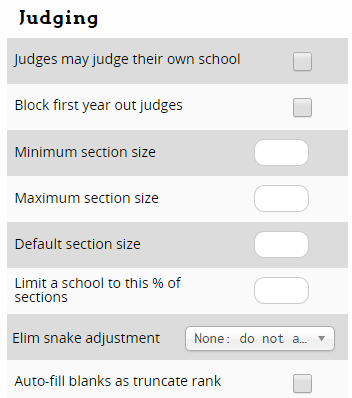
Judges may judge their own school - Generally not recommended, but can be useful in very tight judging situations or when one school is much larger than all the other schools in the field.
Block first year out judges - This will prevent first year judges from judging this event. Note that this requires you to configure the associated Judge Group to allow marking which judges are first year's, otherwise this setting will have no effect.
Minimum section size - For Individual Events with multiple competitors in the same round. This sets the smallest number of competitors that should be in each section of the event.
Maximum section size - Sets how large a section the event will allow before creating a new section.
Default section size - The size of a section the pairing algorithm will aim for if possible. Usually it's best to put this value in between the minimum and maximum section sizes. For example, set a minimum of 5, a default of 6, and a maximum size of 7.
Limit a school to this % of section - If set, will prevent a single school from having more than a certain percentage of the competitors in any given section. Useful to try and ensure an even distribution of students between sections, especially when one school has many more entries than the average school in the field.
Elim snake adjustment - Choose the method for how to distribute competitors from the same school across sections in the elimination rounds of a speech event. There are several different options for how to determine where entries should be placed.
Auto-fill blanks as truncate rank - When selected, this will give any entry that was given a blank in a round (i.e. no score) the value of your "Truncate Rank" set in your tiebreak set. For example, if you have your tiebreakers set to truncate ranks to 5 (so all ranks of 6 or more are changed to a 5), then if a student wasn't ranked, they would receive a 5.
Results
The Results section lets you configure options for the event's ballot and results computations:
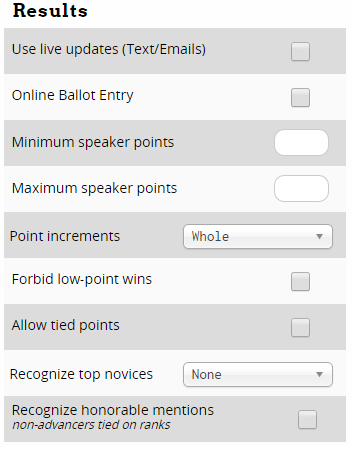
Use live updates (Text/Emails) - Choose whether to use the Live Updates feature for this event, which will email/text entries and judges with schematics and results if they have linked their tabroom account to the relevant entry.
Online Ballot Entry - Currently, only supported for Debate events, though Speech events should work soon. When enabled, this will allow judges to link their tabroom account to their judge entry at the tournament and complete their ballots online, rather than needing the tabroom to distribute, collect, and enter ballots.
Minimum speaker points - The lowest number of speaker points a judge can assign. Note that this value MUST be set before Online Ballots will work, or before printed ballots will include a space for speaker points. If your online ballots are showing as "blank" to judges, this is why.
Maximum speaker points - The maximum number of speaker points a judge can assign. Along with the minimum points, this value must also be set before ballots (online or printed) will function correctly.
Point increments - Choose whether to use Whole, Half, Quarter, or Tenth points.
Forbid low-point wins - When selected, will not allow a judge to assign a win to the team receiving lower points.
Allowed tied points - By default, judges must give a different number of speaker points to each competitor in the round. Checking this box will allow them to give the same points to more than one person.
Recognize top novices - Enable a report in the results which will show the "Top Novices" - you can choose whether to recognize the top novices in the overall event, or only those that didn't advance to elimination rounds.
Recognize honorable mentions - Enables a report in the results to recognize competitors who did not advance to elimination rounds but were tied on ranks.
Online Coin flips
Enabling this feature will conduct the coin flip through Tabroom.com so that students and judges do not need to perform one manually.
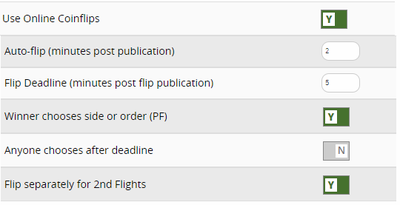
Online settings - First, make sure that your event is marked as an online event by going Settings > Events > select event > Online tab and toggle the "Online Event" button. Then, on the Tabulation tab, toggle the "Use Online Coinflips" button.
Auto-flip (minutes post publication) - This feature allows Tabroom.com to text/email blast teams about who won the coin flip, giving you full control over how long it takes for a coin flip to occur and the round to start. The number you put here determines the delay time between the publishing of the round and the time that debaters begin the coin flip process. For example, if you set it for “5,” debaters will be notified five minutes after the round has been published whether they won or lost the flip.
Flip deadline (minutes post flip publication) - This is the amount of time each entry has to make their selection after being notified it's their turn to choose a flip side. For example, if you set it to “10,” the winner of the coin flip will have 10 minutes to make a selection after they receive notification that they won or lost the flip. If it's a Public Forum event then, the loser of the coin flip will then have 10 minutes to make the other selection after the winner has registered their side or speaker position preference. If neither team makes the selection, sides/order will be randomly determined and locked after the deadline has passed.
Winner chooses side or order (PF) - If you do not select this setting, the winner will only get to choose the side. The losing team will not make a selection unless the winning team fails to meet their deadline for selection. Toggle this setting if you would like the winning side to choose either side or order and the losing side to pick the opposite selection.
Anyone chooses after deadline - If this setting is toggled, the winner of the coin flip will get their set amount of time to make a decision about which side they choose. If the winner does not make a selection within that time limit, then either team may choose their side. NOT toggling this button would mean that the losing team gets dedicated time to make a choice, and if they do not make their choice within the time limit, then Tabroom.com will choose for them. Toggling this button makes it so that if the coin flip winner does not make a choice, the first team to choose their side wins.
Flip separately for 2nd flights - This setting applies to flighted events. If you want your flight A and B coin flip to occur at the same time X minutes after you publish the round, do NOT toggle this setting. If you would like the flight A coin flip to happen X minutes after you publish the round and the flight B coin flip to happen Y minutes after the flight A coin flip, toggle this button. You can determine how much time you would like between the flight A coin flip and the flight B coin flip by entering a number in the “Flight length in minutes” section at Settings > Events > select event > Tabulation. If you enter that you want the auto-flip (minutes post publication) to be 5 and the Flight length in minutes to be 60, then your flight A flip will happen 5 minutes after you publish the round, and the flight B flip will happen 60 minutes after your flight A flip (or 65 minutes after you publish the round).
How to monitor the coin flip - From the Schematics screen, you will see a button at the top labeled “Actions”. Here, you can see the time the flips were performed and when they were blasted. If something happened and flips were not performed or blasted upon publishing, you can manually push through the flip and blast on this page. You can also manually flip the flights separately from this page or change the deadline across the board for the flip selections. Additionally, clicking on the room number of a particular section and scrolling to the bottom, you will see “Flip Status” that lists whether the flip was performed for those students, who made which selection, and if a selection was not made, which team missed their deadline. You can also manually redo flips for individual sections from this page.
Ballot & Rules
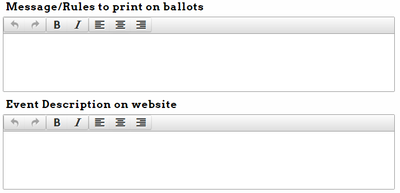
While some ballot settings are set on the previous Tabulation tab, the Ballot & Rules tab will let you set a message or explanation of rules that will appear on ballots for the event, as well as include a description of the event that will be visible on your tournaments public website:
Updates
The Updates tab lets you set one or more "followers" for the event by adding their Tabroom account username/email. Followers will receive a text and email when the first and last ballot is confirmed for each round of the event. This can be useful when you have tournament staff who are delegated to help track down ballots, or when you have a dedicated tab person who runs a single event and would like to be notified when it's time to start tabbing or pairing the next debate.

Deleting/Merging Events
If you need to delete an event, first select it from the list on the sidebar, and then use the "Delete" box:
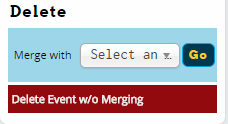
If you want to merge or "collapse" the event into another, for example if the Novice division was too small and had to be merged with the Open division, select the event in the "Merge with" box and click Go.
Or, you can just delete the event by clicking the "Delete Event w/o Merging" button instead.
Speaker Codes
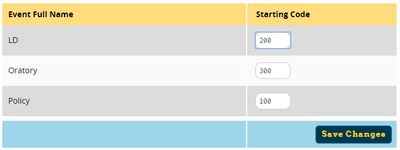
If you need to manually change the starting code number for multiple events, it's usually faster to do this all at once than edit each individual event's settings. Click the "Speaker Codes" link under Batch Changes in the sidebar, and you will be given a list of all events and their starting codes. Just edit the codes in one place, and then click "Save Changes:"
Double Entry Limits
At many tournaments, students are allowed to "double enter" in multiple events, for example Oratory and DI, or in multiple events that take place during different time blocks, for example 1 debate event and 1 IE. At other tournaments, all double entries are disallowed, or restrictions are placed on how many/which events are available to double enter.
By default, double entries are not allowed. To enable them or configure which events can be double entered, select the "Double Entry Limits" option on the sidebar.
First, you'll need to enable double entries by changing the Tournament-wide setting.

You can choose to "Allow up to maximum" to choose the maximum number of competitors that will be allowed to double enter at the tournament, or choose "Unlimited double entry" to set no limit.
If desired, you can then configure "groups" of events which are mutually exclusive with other groups, for example if you can enter only one of LD or Policy:
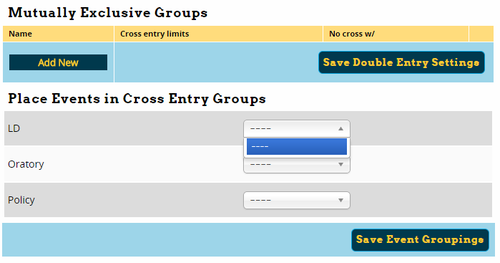
To create a group, click "Add New" and then give the group a name and choose what kinds of double entries (if any) are allowed:

If you choose "None" then entries within that group will not be allowed to enter any other events. If you choose "Unlimited" then they will be able to enter any other events. If you choose "None within group" then they will only be able to enter one event within that group (e.g. only one of Policy or LD). Or, you can set a maximum number of events that can be entered in the group.
Once you have set up the group, you can add events to it by choosing the group for each event, and clicking "Save Event Groupings." If you have multiple groups, you can also choose a value for any mutually exclusive "Cross Entry Group."